

 EU
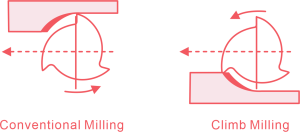
EUEvery milling cut falls into one of two categories: climb milling or conventional milling. The cutter’s rotation relative to the feed direction changes cutting force, chip formation, and tool life, so the choice affects part tolerance, surface finish, and machining cost.
This article compares how each method works, their advantages and disadvantages, and how to choose the right strategy for a given part. It’s written for mechanical engineers specifying tolerances, product designers reviewing manufacturability, and procurement managers evaluating a supplier’s process.
What Is Climb Milling?
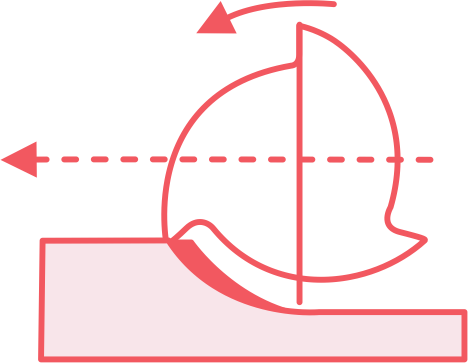
Climb milling, also called down milling, occurs when the cutter rotates in the same direction as the workpiece feed. The tooth engages the material at maximum chip thickness and exits where the chip thins to zero. Picture each chip as a wedge, wide at the start and tapering to nothing by the time the tooth leaves the workpiece.
This motion creates a downward cutting force that presses the workpiece against the fixture rather than lifting it. Because the chip thins toward the end of the cut, the tooth shears the material along a cleaner shear plane instead of dragging across an already-cut surface. Chips fall behind the cutter rather than in its path, which keeps the flutes clearer for coolant and swarf removal on deep pockets or slotting work.
Most CAM software used for CNC milling defaults to climb milling for finishing toolpaths. Modern machines build in backlash compensation, so the direction is simple to hold. Once the setup is dialled in, many shops treat climb milling as the preferred way to leave a final surface.
Best Practices for Climb Milling Setup
Getting a clean result from climb milling depends on more than picking the right direction. A few setup habits separate a good pass from a scrapped part.
- Verify Backlash Compensation: Confirm the machine’s backlash eliminator or ballscrew preload is functioning before running a climb pass, since a worn table will let the tool grab the material.
- Use Rigid, Short Tool Stick-Out: Keep the tool as short as practical to reduce deflection when the tooth loads up at maximum chip thickness on entry.
- Secure Thin Features Separately: Reduce feed rate or switch to conventional milling on ribs, thin walls, or unsupported sections that could be pulled away from the part.
- Confirm CAM Direction Settings: Check that the CAM software’s toolpath direction is actually set to climb, since some post-processors default to conventional unless told otherwise.
- Match Feed Rate to the Material: Softer, non-ferrous materials tolerate faster feeds under climb milling. Hard or scaled stock is better roughed with conventional milling first, so keep climb passes for the finish once the scale is gone, since too much depth on entry can shock the tool.
What Is Conventional Milling?
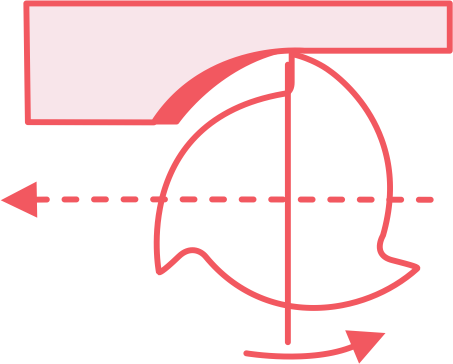
Conventional milling, also called up milling, is the traditional approach and works the opposite way. The cutter rotates against the feed direction, so the tooth starts at zero chip thickness and builds up to maximum thickness by the time it exits.
This generates upwards forces that tend to lift the workpiece away from the machine table, which is why fixturing matters more with this method. The tooth also rubs against the surface briefly before it starts cutting, and the chips created are carried upward and forward, ahead of the cutter rather than behind it. Many manual machinists still treat this as the preferred method, since it does not depend on how well the machine’s backlash has been tuned.
Conventional milling has not disappeared from modern shops either. Many CNC programs still call for it when roughing through cast or forged skins with carbide inserts, since the gradual rise in chip thickness gives the edge a more predictable load than biting straight into scale.
Best Practices for Conventional Milling Setup
Conventional milling still needs the right setup to pay off. These conventional milling techniques keep performance consistent across different machines and materials.
- Increase Clamping Force: Since the upward cutting force lifts the workpiece, secure the part firmly, especially on thin or lightly held setups.
- Check Backlash Before Running: On a manual milling machine or other older equipment, verify how much play exists in the table and compensate the toolpath if the control allows it.
- Start With a Reduced Feed on Hard Skins: When roughing forgings, castings, or hot rolled stock, ease into a controlled feed until the tool clears the scale layer.
- Add Coolant or Cutting Fluid: Helps offset the extra heat generated during the rubbing phase at the start of each cut, extending tool life.
- Plan the Switch to Climb Milling: If a finishing pass is required, rough conventionally to clear the hard layer, then switch direction for the final light pass.
Differences Between Climb Milling and Conventional Milling
How It Works
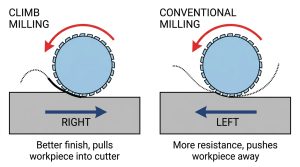
Climb Milling: rotates the cutter with the feed direction, so the cutting tool pulls itself through the material.
Conventional Milling: rotates against the feed, so the tool works its way forward instead of being drawn in.
Chip Formation
Climb Milling: removes a chip that starts thick and tapers to zero.
Conventional Milling: does the reverse, with chip thickness starting at zero and building to maximum by the end of the cut. Nearly every other difference between the two milling methods traces back to this one.
This chip thickness pattern is different from chip width, which is set by the depth of cut and stays much the same through the pass.
Cutting Force Direction
The cutter forces at work in each method point in opposite directions, which shows up clearly on horizontal milling machines where the table orientation makes the difference easy to see.
Climb Milling: presses the workpiece down onto the table, which helps keep it seated.
Conventional Milling: lifts the workpiece away from the table instead, which puts more demand on the clamping.
Entry Condition
Climb Milling: enters the material at maximum chip load right from the first contact, the cutter creating the heaviest bite of the cut immediately. This entry shock stresses the tool and spindle, which is one reason climb milling suits robust, well-supported setups better than fragile ones.
Conventional Milling: starts at zero chip thickness, so the tooth eases into the cut rather than slamming into it. This protects slender or delicate tools, such as small-diameter end mills and dovetail cutters, though the tooth does rub against the surface for a moment before it starts to bite.
Surface Finish
Climb Milling: tends to produce a better surface finish, since chips clear behind the cutter rather than being dragged back through the cut.
Conventional Milling: is more prone to re-cutting chips at the front of the tool, which usually leaves a rougher surface, making it harder to hit a demanding desired surface finish in one pass.
Tool Wear
Climb Milling: keeps rubbing and heat low at the start of each cut, and clearing chips behind the cutter this way increases tool life.
Conventional Milling: rubs before it bites, generating more heat at the start of the cut, and that friction wears the edge down faster over time, and faster tool wear will more likely transfer to a rougher surface on later parts.
Machine Compatibility
Climb Milling: needs a rigid machine with minimal backlash or backlash compensation, a feature that modern machines usually build in, since the pulling action will exploit any looseness in the table.
Conventional Milling: works against backlash rather than provoking it, which makes it the safer default on older manual machines without a backlash eliminator.
Workholding and Thin-Wall Behaviour
Climb Milling: presses the workpiece down into the fixture, which helps keep flexible parts seated and generally reduces chatter, so less complex work holdings are often enough to hold the part. That same force becomes a risk on thin wall work, such as unsupported ribs, where the pulling action can tear the feature away if the feed is not eased back near those sections.
Conventional Milling: lifts the part away from the table rather than pressing it down, so thin or lightly clamped parts need firmer clamping across the whole setup, sometimes with complex work holdings or, on larger parts, expansive work holdings, to keep everything seated. It does not carry the localised tearing risk that climb milling does on unsupported features, which is why many shops default to conventional on delicate parts unless the fixturing is unusually rigid.
Tool Deflection and Wall Taper
Climb Milling: tends to push the cutter away from the wall it has just cut, which can leave the wall slightly oversized but straight.
Conventional Milling: tends to pull the cutter into the cut, which carries more risk of the tool digging in and leaving a tapered wall. On long, slender walls or tight-tolerance profiles, this difference in deflection direction can matter more than surface finish alone.
Primary Application
The following illustration lines up seven common scenarios against the recommended approach and the reasoning behind it.
| Scenario | Recommended Approach | Reason |
| Thin-walled or delicate parts | Conventional (default) / Climb if well-fixtured | Protects against distortion; climb only if fixturing is very rigid |
| Tight-tolerance faces and bores (e.g. pump housing bore, sealing face) | Climb | Meets flatness and surface roughness callouts in one pass |
| Cast iron, forgings, or hot rolled stock with scale | Conventional to rough, climb to finish | Clears the hard outer layer without risking a fresh insert edge |
| Older manual machines with noticeable backlash | Conventional | Cutting force works against backlash instead of exploiting it |
| Modern CNC machines or gantry routers with backlash eliminators | Climb | Pulling action no longer risks jerking the table as the spindle moves through the cut |
| Soft or non-ferrous materials (e.g. aluminium) | Climb | Lower heat generation extends tool life |
| Full-width slots | Mixed (climb on one wall, conventional on the other) | Both directions occur in the same pass; favour climb for the finishing pass if both walls carry a tolerance |
How To Choose Between Climb and Conventional Milling?
When to Use Climb Milling
- Modern CNC machines or gantry routers with backlash eliminators handle the pulling action safely.
- Finishing passes, where surface quality and tight tolerances matter more than raw material removal.
- Soft materials and non-ferrous metals such as aluminium, where less energy is lost to heat and tools last longer as a result.
When to Use Conventional Milling
- Older manual machines with noticeable backlash and less power at the spindle.
- Hard materials with an abrasive outer skin, such as castings, forgings, or hot rolled steel.
- Heavy roughing passes, where the gradual rise in chip thickness gives more control under high deflection forces.
Mixed Milling in a Slot
A full slot cut at the tool diameter does not sit neatly in either category. As the cutter moves down the centre of a slot, one wall sees the rotating cutting tool moving with the feed, and the opposite wall sees it moving against the feed. One side of the slot is cut by climb cutting and the other side by conventional milling, in the same pass.
Looked at from a single tooth’s path through the cut, the same thing is happening: chip thickness runs from zero up to maximum and back down to zero. One tooth passes through a conventional phase and a climb phase within a single rotation.
This is why many CAM packages list a third toolpath option, often called mixed or zigzag cutting, alongside pure climb and pure conventional cutting. A mixed strategy lets the cutter run back and forth without retracting between passes, which shortens cycle time on roughing operations where material removal rate matters more than the finish on either individual wall.
For a finishing pass on a slot with a tolerance on both walls, a single direction, usually climb, still gives the more consistent result.
Choosing between climb and conventional milling comes down to the machine, the material, and the finish required, and getting it right protects both the tool and the part. At Aria Manufacturing, our machinists apply both strategies depending on the job at hand. Get in touch to discuss your next manufacturing project.
Frequently Asked Questions
Is climb milling always better than conventional milling?
No. Climb milling usually gives a better surface finish and longer tool life, but it needs a rigid machine with backlash compensation. On older manual machines, or when roughing through scale and hard skins, conventional milling is often the safer and more practical choice.
Why does climb milling need backlash compensation?
Climb milling backlash shows up because the cutter pulls itself into the material instead of pushing against it. On a machine with loose backlash, that pulling action can drag the table forward and let the tool grab an extra bite of material, which can break the tool or scar the part. Backlash compensation on the lead screw, or a preloaded ballscrew, keeps the table from moving unexpectedly.
Can conventional milling be used on a CNC machine?
Yes. Even modern CNC machines with backlash eliminators still use conventional milling for roughing hard or scaled materials such as forgings and castings. Many shops rough conventionally to clear the outer skin, then switch to climb milling for the finishing pass. A light conventional mill finish pass, sometimes called a spring pass, can also clean up a surface that was roughed with climb milling.
What happens if you climb mill on a machine without backlash compensation?
The cutter can grab the workpiece and pull the table forward faster than intended, taking an uncontrolled bite of material. This can break the tool, damage the part, or in severe cases stall the spindle. That is why conventional milling remains the safer default on older manual machines.
Which method gives a better surface finish, climb or conventional?
Climb milling generally produces a smoother surface, because the chip thins toward the end of the cut and clears behind the cutter rather than being dragged back through it. Conventional milling is more prone to re-cutting chips at the front of the tool, which tends to leave a rougher surface.
-100x100.jpg)