

 EU
EUThe tool you choose is the biggest single factor in the finish you get on a lathe. Turning tools are attached to the machine to shape turned parts, and their ability to withstand stress and resist deformation decides whether the result is clean and repeatable or rough and inconsistent.
These tools do the actual work, and their movement along the workpiece sets the final shape. There are many different cutting tools, each built for a specific job, so knowing what each one does helps you pick the right tool the first time. Precision in lathe cutting tools is what separates high quality, detailed results from scrap, and it depends on choosing a tool that suits both the material and the cut.
In this post we walk through the most common lathe cutting tools, how they are built, and where each is used. Let’s get started.
What Are Cutting Lathe Tools?
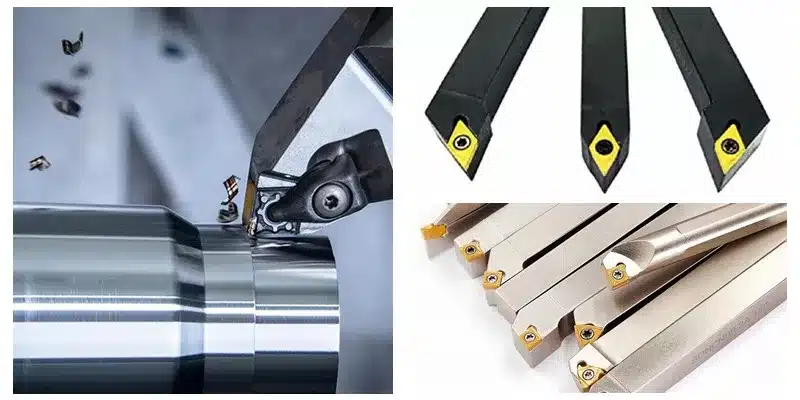
Cutting or turning tools remove material, open existing holes wider, or press knurl marks into a workpiece during machining. They come in different shapes, materials, and designs, and the difference between various lathe cutting tools lies in their properties and applications, which decide how well each one suits a particular machining process. Every tool is unique in its configuration.
There is a wide range of lathe cutting tools built to address different machining needs, offering versatility in materials, shapes, and operating conditions. A bevelling tool, for example, uses a set cutting angle near 45 degrees to cut the edge of a workpiece. It does that job well but is unsuitable for other tasks. Before you can match a tool to a job, you need a clear picture of what each different cutting tool can and cannot do.
Alongside standard lathe cutting tools, specialist cutting tools such as drag knives and tangential knives handle applications that need extra precision or an unusual cutting direction.
Introduction to Metal Cutting
Metal cutting turns raw stock into components with precise shapes, sizes, and surface finishes. At the heart of the process is the cutting tool, a rigid, wedge-shaped device that removes excess material from a workpiece with accuracy and efficiency.
The cutting process depends on the interaction between the cutting tool and the workpiece. A relative velocity is set up, usually by rotating or moving the workpiece against the tool with machine tools such as lathes, milling machines, or drilling machines. As the edge engages, it lifts a chip whose chip thickness depends on the feed rate and the depth of cut, and controlling that chip thickness is central to a stable machining process.
The goal of the metal cutting process is to reach the target shape and dimensions while keeping quality high and waste low. A cutting tool has to be made from a material with high hardness and durability so it can withstand the heat and friction of machining. Whether the job is rough machining to remove stock quickly or precision machining for a tight tolerance, the tool has to deliver consistent performance so each layer of material comes away cleanly. Picking the right cutting tool and dialling in the cutting parameters is what gives manufacturers accuracy, surface quality, and productivity in every machining process.
Classification of Lathe-Cutting Tools
It can be hard to tell lathe cutting tools apart because they come in so many shapes and sizes. Standardized systems group them so they are easier to identify and select, and once you know the groups it is much easier to recognise which turning tool is which on the bench. Following established practice in tool classification keeps performance and efficiency high in the workshop.
Class 1. Lathe-Cutting Tools Based on Material
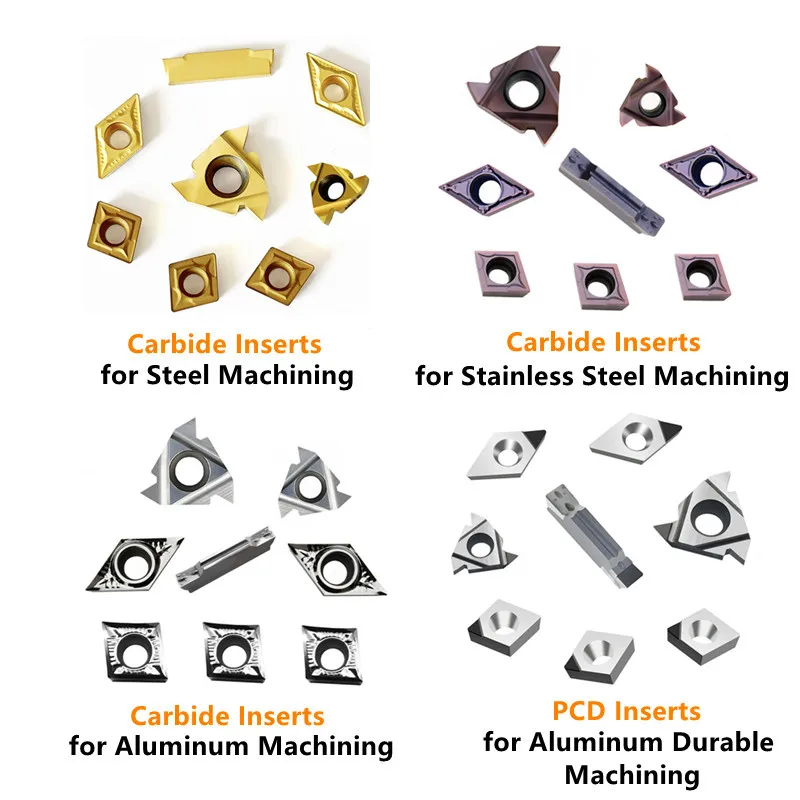
All kinds of metallic and non-metallic workpieces pass through lathe machine tools, from soft aluminium to cast iron and hardened steel. Because these materials have different mechanical and chemical properties, you need different cutting tools to cut each one properly.
That is why cutting tools are made from specific materials suited to specific tasks. Choosing the right tool material is central to good performance and long service life. The range of tool materials is wide, and each offers its own mix of hardness, toughness, and heat resistance. The choice of tool material and tooling system feeds straight into workpiece surface quality and efficiency, so matching the tool to the cut material matters whether you are running lathe tools, drills, or other cutting implements. Modular tooling systems add flexibility across lathe machine tools and their operations.
Here are the most common tool materials.
High-speed steel (HSS)
High speed steel tools first appeared in the late 1940s as an improvement on high-carbon steel tools. HSS has a better chemical composition that lets it cut faster and more effectively, which is why it is often sold as a “high speed steel lathe tool set.” It stays tough and holds its shape even when hot, thanks to the alloys it is made from.
The main components of HSS are iron (Fe) and carbon (C), giving the general formula Fe-C-x. The “x” can be tungsten, vanadium, or cobalt, and those elements are what give HSS its toughness and high heat resistance. HSS tips are common on cutting tools because they take a durable, sharp edge.
Carbide cutter
Most carbide end mills have a steel body with removable blades that carry carbide brazed to their edges. Carbide tools keep an excellent surface finish that does not wear quickly, and carbide cutting tools can last many times longer than HSS because they stay sharp even when running fast or hot. There are two main kinds: carbide-tipped tools and carbide insert tools. Carbide-tipped tools are usually one piece, so a blunt edge can mean replacing the whole cutter. The manufacturing process for carbide tips uses precise bonding to keep them durable.
With carbide inserts you simply index the insert to a fresh side when one wears, which holds size and finish for longer. Carbide-tipped saw blades often use specially shaped teeth for efficient material removal. For high temperature cutting on hard materials, carbide tools are a dependable first choice before you step up to CBN or ceramic.
Cubic boron nitride (CBN)
CBN, or cubic boron nitride, is one of the strongest materials on Earth after diamond. On lathes it can cut metals and alloys very fast with no need to cool down mid-cut. The reason is that CBN is chemically inert, so it does not react with carbon or its alloys.
CBN is more heat resistant than carbide and HSS combined, and even more heat resistant than diamond. Its high hot hardness lets it hold a keen edge at raised temperatures, which is critical for machining hard materials such as hardened tool steel. CBN also resists chipping during high-speed machining, giving longer tool life and steady results. That speed and efficiency can cut the overall cost of a part by around 60 percent.
Diamond lathe tool
Diamond lathe tools are the best choice for cutting and finishing to very fine accuracy. They are usually made as single-point cutting tools, since diamond is costly and hard to source. In most cases the diamond tip is joined to the working part of the tool by welding or brazing. Diamond tools are precisely ground to a sharp, accurate edge, which is what high-precision work needs, and grinding wheels are used to prepare and resharpen them.
Ceramic lathe tool
Ceramic lathe tools are popular because they are chemically stable and can produce both rough and smooth surfaces. They wear slowly and take a lot of heat. Ceramic tools can also cut hard materials such as hardened steel and cast iron at high speed without coolant, just like CBN. The ceramic insert turning tool is a common type: the insert screws into a tool holder, and you can index its sides like a carbide insert to hold quality for longer. Ceramic hardness is often checked with Knoop or Vickers tests, which help predict wear, and the material resists chipping and cracking under demanding conditions.
Beyond these, drills are another common home for advanced tool materials, especially for hardened steels. Specialist tools such as grooving and knurling tools cut a notch or pattern into the workpiece for a specific job. Choosing the right tool materials and tooling system is what secures workpiece surface quality and keeps the tool compatible with the cut material.
Class 2. Lathe-Cutting Tools Based on Operation
You can also identify turning tools by what they do: turning, threading, chamfering, forming, facing, boring, grooving, parting, and knurling tools. The orientation of the cutting edge and the cutting direction matter for every one of these, because they set the precision and quality of the machining result.
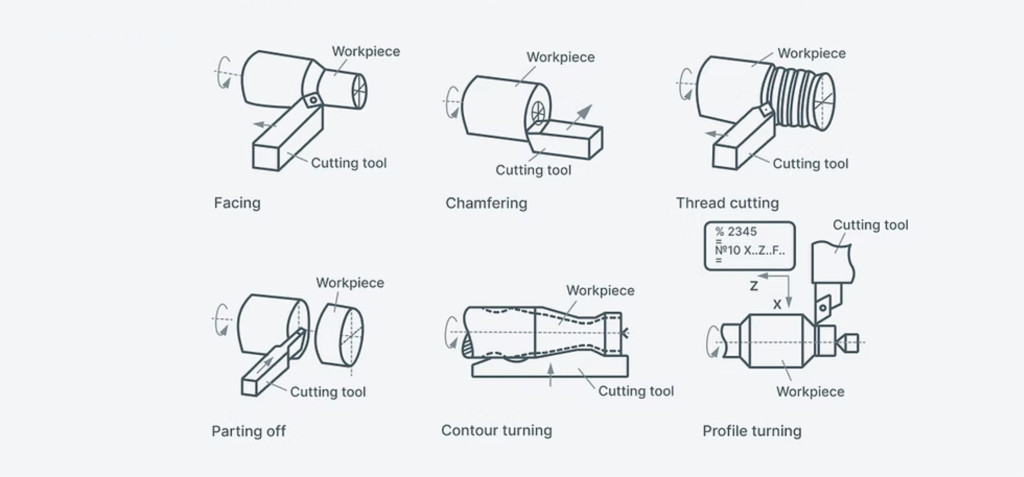
Turning tools: Turning is one of the most widely used machining operations, removing material from a workpiece. It can be a rough turning pass to rough out the basic shape or a fine pass to leave a clean surface.
Thread cutting tools: A threading tool cuts the helical form of a thread, for example the external threads on screws and bolts. It is usually the last step after turning a cylindrical workpiece.
Chamfering tools: Chamfering tools smooth surfaces or knock off rough edges. This process, also called chamfering, cuts a bevel at a set cutting angle near 45 degrees so the finished part is safer to handle.
Form tools: A forming tool shapes the workpiece to a set profile. Because the forming tool carries the finished profile on its edge, it can create that shape in one pass instead of several.
Facing tools: A facing tool finishes the end of a workpiece. The facing tool sits at right angles to the rotating workpiece, and its relief angles keep the rest of the tool clear of the cut.
Boring tools: Boring tools are single-edged tools mounted on a boring bar that open existing holes to a larger diameter. A rigid boring bar keeps chatter down as you reach deep into the bore, and by feeding the boring bar in and out you can produce a cylindrical or conical form. Because the boring bar works inside existing holes, it cannot start a hole on its own; you drill first, then bore.
Grooving tools: Grooving tools cut grooves or furrows into a cylindrical workpiece, inside or out, feeding on a line perpendicular to the surface. Because this has to be accurate, it is usually done on CNC machines rather than by hand.
Parting tools: Closely related are parting tools, which feed straight in to cut a finished part off the stock. Parting tools run a narrow blade square to the lathe’s axis, so alignment and a steady feed are what keep the cut clean.
Knurling tools: These press a criss-cross pattern into the surface of a workpiece. The knurl adds friction so the part is easier to grip.
Class 3. Lathe-Cutting Tools Based on Structure
The third way to sort cutting tools is by how they are built, from a single solid piece or a mix of materials. They fall into three groups: single body tools, clamped tools, and welded tools.
Single body tools: As the name says, a single body tool holds every part in one piece, so the cutting edges, shank, and tool bit are one solid tool bit. Ground HSS single body tools are common when you need a custom profile.
Tools with clamps: These are usually replaceable. Tool inserts are screwed or clamped onto a shank and tool holder to form a complete component, and each insert often carries more than one cutting edge.
Welded tools: These carry separate parts or cutting edges that are welded or brazed together to improve turning or finishing. Many drilling and grooving tools belong to this group.
Class 4. Lathe Cutting Tools Based on Feed Direction
Lathe cutting tools can also be grouped by the direction they travel along the workpiece. This matters because the feed direction sets the operation and the final shape. The main types are:
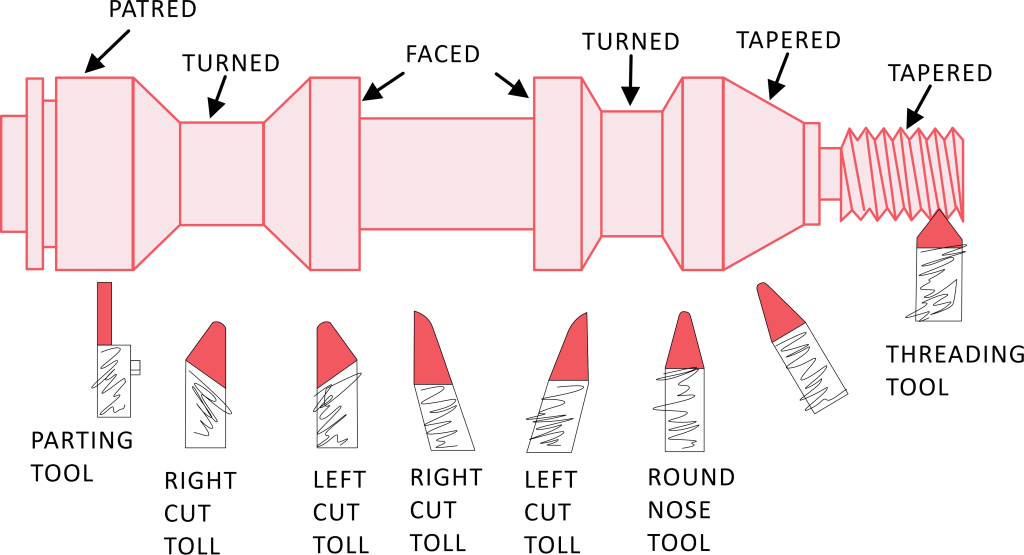
Longitudinal Cutting Tools: These move along a line parallel to the axis of the workpiece, removing material down its length. Longitudinal cutting is the usual choice for turning down a diameter or making a uniform cylinder, which is ideal for shafts and rods.
Cross-Cutting Tools: These move along a line perpendicular to the length of the workpiece, cutting across its diameter. This is the motion used for parting off or for grooves and notches, and it is how you separate a finished part from the stock.
Face-Cutting Tools: These work along the end face of the workpiece, taking material off the end to leave a flat surface or hit a precise length. Facing prepares a workpiece for later machining or assembly.
Right-hand turning tools: These cut as they feed from right to left toward the chuck.
Left-hand turning tools: These feed from the left side toward the tailstock, removing chips as they go.
Round nose lathe tools: Also called centre turning tools, these can carry the same angle on the left and right sides of the main cutting edge.
Whichever feed direction you use, proper alignment of the tool to the lathe’s axis keeps the cutting edge on a true line parallel or line perpendicular to the work, which protects both accuracy and tool life.
The Importance of Cutting Edge
The cutting edge is the defining feature of any cutting tool and the part that makes or breaks a machining operation. It is the section that meets the workpiece, shears the material, and forms the final shape. A well-ground cutting edge is what gives you precise, high-quality results, because it sets the efficiency, accuracy, and surface finish of the workpiece. A single point tool carries one main cutting edge, while tools with multiple cutting edges share the load across several edges.
To survive metal cutting, the cutting edge has to be sharp and made from a material with high hardness, such as high speed steel or carbide, so it keeps its shape under heat and pressure. Its geometry, meaning the angle, shape, and size, drives cutting force, chip formation, and how smooth the finished surface comes out.
A high-quality cutting edge lifts the efficiency of the whole cut and extends the working life of the tool, which cuts downtime and replacements. Choosing tools with the right cutting edge design and material is what keeps every part to standard.
Components of a Lathe-Cutting Tool
Now that the classifications are covered, here are the parts of lathe cutting tools that let them do such precise work.
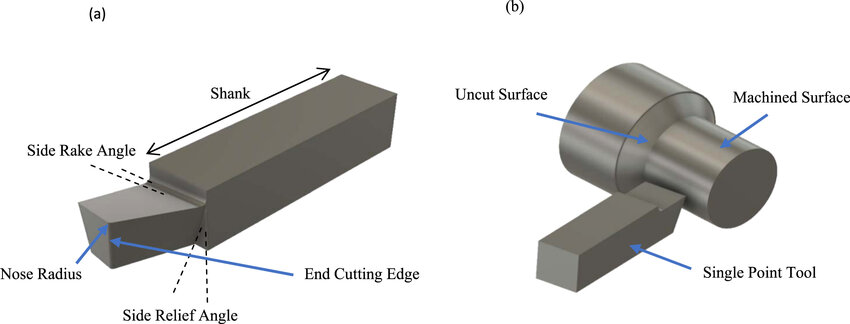
Shank: The shank is the tool’s body, the part that clamps into the holder. Its shank surface is plain and usually held by friction against the tool holder, so keeping the shank surface clean and square supports proper alignment in the post. Because the tool’s body carries all cutting force into the post, a rigid tool’s body limits deflection.
Cutting Edge: Also called the tool lips, the cutting edge does the work. It is often brazed with a hard coating such as diamond or carbide, and it is the point that shapes the workpiece and removes chips.
Face: The face, or tool face, is where the chip flows off during machining. The tool face is ground with a curve so chips slide away instead of clogging, and rake angles are measured from the tool face.
Lathe-Cutting Tool Angles: Three families of angles are ground into the tool to streamline the cut: rake angles, relief angles, and cutting edge angles. They shape chip flow, tool wear, and the finished surface, and the section below breaks down each one.
Nose or Cut-Off Point: This is the rounded tool nose where the main cutting edge and the auxiliary edge meet. That minor cutting edge intersection at the tool nose is given a small radius, and the size of the minor cutting edge intersection sets the nose radius. A rounded tool nose leaves a cleaner surface finish and makes the tool last longer.
Flank: Every single point tool has two cutting edges and two flanks. The major flank sits next to the side cutting edge, and the minor flank sits next to the end cutting edge. The flank leading edge meets the work first, so wear on the flank leading edge is worth watching.
Heel: The heel is the rounded part that joins the flanks to the base of the tool.
Understanding Lathe Cutting Tool Angles
The angles ground into a lathe cutting tool decide how it cuts, how long it lasts, and how clean the finished surface comes out. Three families do most of the work: rake angles, relief angles, and cutting edge angles.
Rake angles control chip flow and are read on the tool face. Back rake angles tilt the face along the length of the tool, while side rake angles tilt it across the width, and together these back rake angles set how freely the chip lifts. A high rake angle gives a lighter, sharper cut on soft metals, while a smaller or negative high rake angle adds strength for hard materials and interrupted cuts. Many shops keep ground tools with several different rake angles for exactly this reason.
Relief angles stop the tool rubbing the workpiece. The side relief angle clears the flank below the side cutting edge, and the end relief angle clears the flank below the end cutting edge. A side relief angle that is too small lets the tool drag, while a side relief angle that is too large weakens the edge; the end relief angle behaves the same way at the nose.
Cutting edge angles aim the edge into the work. The side cutting edge angle sets how the side cutting edge leads into the cut and how chip thickness builds, and a larger side cutting edge angle spreads the load over more of the edge. The end cutting edge angle keeps the end cutting edge clear of the finished surface, and a small end cutting edge angle leaves a smoother face. The inclination angle tilts the whole edge so the chip runs to one side, and choosing the inclination angle together with the cutting edge angle controls where the chip goes and how clean the finish looks.
Factors to Consider Before Choosing Lathe-Cutting Tools
Good fabrication starts with the right tool. Here is what to weigh for reliable performance and efficiency.
1. Lathe Tools Coating: A coating is a sure way to slow wear and rust. It also gives the tool a mechanical edge against heat and friction that would otherwise deform it, often through inert compounds like CBN or carbide.
2. Cutting Speed and Feed Rate: You cannot cut every material at the same speed. Harder or thicker stock needs more torque and a lower speed, while softer material can run faster, and the feed rate you pick also sets the chip thickness. Match the speed and tool to the material in front of you.
3. The Workpiece and Type of Material: Before you buy, note the workpiece material. The rule is simple: the cutting tool must be harder than the workpiece material, and you can check that hardness with a Brinell tester.
4. The Type of Finish You Need: Decide on the finish first. Whether it is turning, cutting, or knurling, match the right tool to the result you want before you commit.
5. The Type of Lathe Machine: Finally, think about the machine. The main types are manual and automated CNC lathes. On a manual lathe you may swap a tool bit by hand, while a quick change tool post lets you drop in a preset holder in seconds. A quick change tool post supports rapid tool changes and returns each tool holder to the same height, which protects repeatability, tool life, and proper alignment.
Conclusion
The secret to a top-quality finish in any metal cutting job is picking the right cutting tool. Hopefully this guide gives you what you need to identify the lathe cutting tools that fit your machining needs, whatever machine you run.
