Have you ever thought about why things made of plastic look and feel the way they do? The surface finish is often the key.
The surface of an injection moulded part is more than just a pretty face. It can affect how the product performs, how it feels in your hand and even how it was made. Getting it right is an important part of manufacturing and designing products.
We’ll walk you through everything you need to know about injection molding surface finishes if you stay with us for the next few minutes. We’ll examine the various types that exist, their significance, and how to select the best one for your next project. Let’s get started.
What Are Injection Molding Surface Finishes?
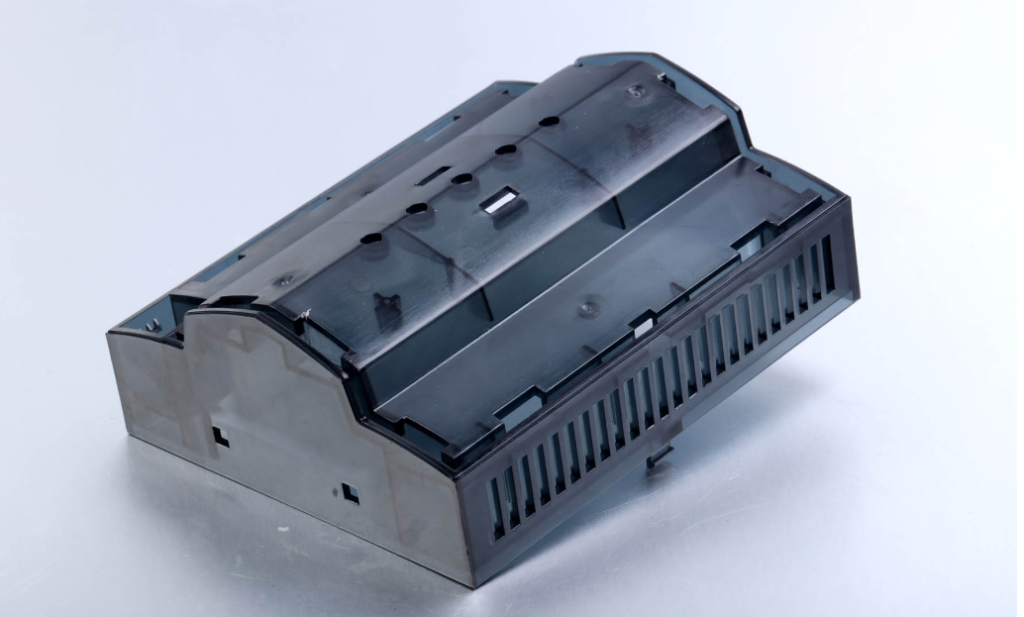
What are we actually talking about here? Injection molding surface finishes refer to the texture and appearance of a plastic part after it has been removed from the mold. It is not applied afterwards.
Instead, the surface is created by working on the inner surfaces of the mould. During the injection moulding process, the texture of this mould surface is transferred directly to the hot plastic.
Think of the mould as a stamp. The stamp leaves an imprint on the material that corresponds to the pattern or texture. This means that in the plastics industry, you need a very polished mould if you want your product to have a shiny surface.
If you want the mould to have a textured feel, you need to apply the texture first. The finished moulded part will look and feel exactly like the surface of the mould, down to the smallest detail.
Types of Injection Molding Surface Finishes
Now that you understand the importance of injection molding surface finishes, let’s look at the two major types.
1. SPI Surface Finish
The end surface finish of a part is an important decision in product design and manufacturing. Why? It’s because it greatly affects a part’s aesthetics, function, and feel.
The SPI (Society of the Plastics Industry) surface finish guidelines are the specifications that govern these important properties for injection-molded plastics.
These standards provide a common reference for designers, engineers, and manufacturers to discuss and communicate a specific texture or polish. This process helps ensure that the actual product looks and feels like the initial design intent.
To ensure that the parts meet not only performance specifications but also the quality and aesthetic that meet customers’ expectations, it is critical to understand these specifications.
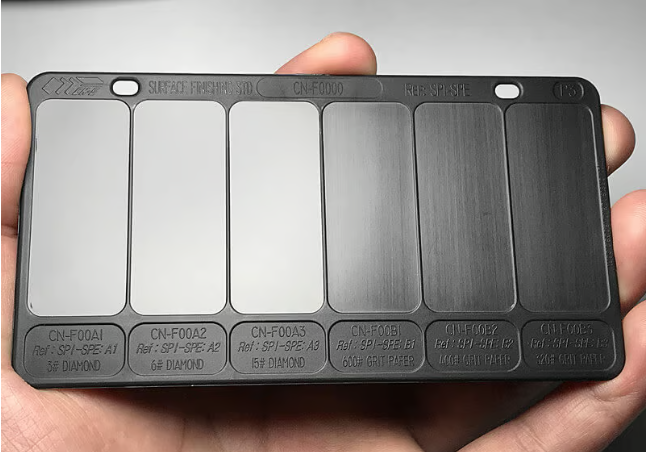
The SPI composition is a comprehensive system that categorizes surface finishes into twelve levels in total. In this system, there is a sequential alphanumeric taxonomic hierarchy – every standard has a letter designation (A, B, C, or D) and a number (1, 2, or 3).
The designations are not a matter of chance; they relate to descriptive finishing processes and a quantifiable surface roughness, measured in micrometres (µm) and expressed as average roughness (RA).
The SPI standards are organized into four categories at the highest level. Each category provides a different appearance, and each category results from different processing:
Grade A: Gloss finishes. The grade produces a surface with a mirror-like appearance and reflects light, and is polished using diamond abrasives.
Grade B: Finishes with a semi-glossy appearance. Finishes in this grade utilize fine-grit polishing paper to provide a surface that has shine but does not reflect light as accurately as Grade A.
Grade C: Finishes with no shine. These finishes are dull or muted since they have been processed with stone abrasives, which do not reflect light.
Grade D: Finishes with a texture to it. Finishes are achieved by applying a dry blasting process to provide the mould with a tactile non-slip finish.
The SPI guidelines also specify there will be a default “as machined” finish for parts that do not require a specific finish. “As machined” finishes will contain visible tool marks and have a surface roughness of 3.20 RA.
Detailed Breakdown of SPI Surface Finishes
The twelve SPI callouts provide a lot of design control for designers. This chart outlines each specific standard with its grade, finishing method, and associated surface roughness expectation for the finished part.
Document
SPI Standard
Finish (Grade)
Finish (Type)
Finishing Method
Typical Surface Roughness (µm)
A-1
Glossy
Super
Grade #3, 6000-Grit Diamond
0.012 to 0.02
A-2
Glossy
High
Grade #6, 3000-Grit Diamond
0.025 to 0.05
A-3
Glossy
Normal
Grade #15, 1200-Grit Diamond
0.05 to 0.10
B-1
Semi-Glossy
Fine
600-Grit Paper
0.05 to 0.10
B-2
Semi-Glossy
Medium
400-Grit Paper
0.10 to 0.15
B-3
Semi-Glossy
Normal
320-Grit Paper
0.28 to 0.32
C-1
Matte
Fine
600-Grit Stone
0.35 to 0.40
C-2
Matte
Medium
400-Grit Stone
0.45 to 0.55
C-3
Matte
Normal
320-Grit Stone
0.63 to 0.70
D-1
Textured
Satin
Dry Blast Glass Bead #11
0.80 to 1.00
D-2
Textured
Dull
Dry Blast #240 Aluminum Oxide
1.00 to 2.80
D-3
Textured
Rough
Dry Blast #24 Aluminum Oxide
3.20 to 18.0
SPI Standards and Injection Molding Materials
Every product designer needs to recognize that the final surface finish is defined by two things: how polished the mold is, and what plastic polymer is being injected into the mold with the highly polished surface.
When you use the same highly polished mold with different polymers, it will create different things. The inherent properties of the plastic, hardness, flow, and chemical makeup, will dictate how well it can replicate the microscopic details of the surface of the mold. Selecting the proper material is just as necessary as selecting the proper SPI standard.
We will also include tables for common materials that are used in injection moulding, and a few examples of when and how they are used.
Grade A: Glossy Finishes for High-Polish Uses
Furthermore, people select glossy finishes for components that have to be very shiny and reflective, such as optical lenses, mirrors, or flat clear cases on electronics.
SPI A-1 is only for the finest optical components where clarity and flawless surface finish are the most important desires.
SPI A-2 is decent for components that are shiny and/or see-through but do not need to be optical.
SPI A-3 provides a high-to-medium polish finish and is favorable for decorative parts and non-optical lenses when a shiny surface is necessary.
The type of plastic you are using has a huge impact on the quality of the finish. Some materials, such as acrylic, are known to provide consistent and excellent results, while others might never achieve a perfect polish.
Grade B: Semi-Glossy Finishes for a Balanced Look
Semi-glossy finishes are an in-between option that provides some high-gloss shine and is not a matte surface. This is why it is so suitable for many consumer goods like injection-molded clips or injection-molded electronic housings, where a clean, medium shine is desired.
However, the surface does not need to have excessive shine to show fingerprints or minor imperfections. B-grade finishes generally work well on a variety of common plastics.
Grade C: Matte Finishes for a Functional, Understated Appearance
Matte finishes are non-reflective, dull surfaces that have a great deal of utility for products where function and durability are more important than shine. One of the best characteristics of a matte surface is that fingerprints and small scratches from handling can become virtually invisible.
This is important for products such as keyboards, the frames of laptops and other things designed for a lot of handling. This finish can also provide a professional but unobtrusive look to products that would benefit from avoiding glare.
Grade D: Textured Finishes for Grip and Durability
Textured finishes take the appearance beyond proprioception to include tactile sensation and performance. These styles of surfaces have been made to be gripped, so they have a broad range of utility, prevalent in tool handles, steering wheels, or any tool requiring durability, like a shop vac. The texture makes for a good gripping surface and also does a decent job of hiding light scratches and wear over time.
Most plastics typically work well with texturing, but some combinations with regards to materials and finishes that the designer needs to be wary of. For example, generally, you would not want to use polycarbonate with the more coarse D-2 and D-3.
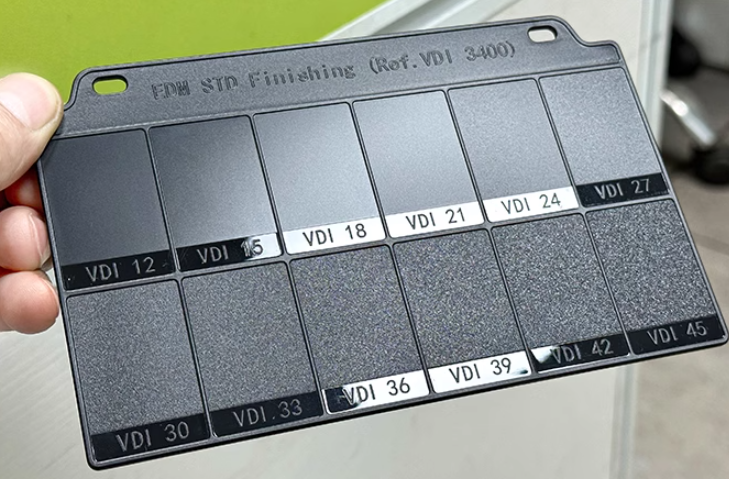
2. VDI Surface Finish
SPI is a common standard in many of the places, but VDI is also a common set of standards that was developed by the Verein Deutscher Ingenieure (the Association of German Engineers).
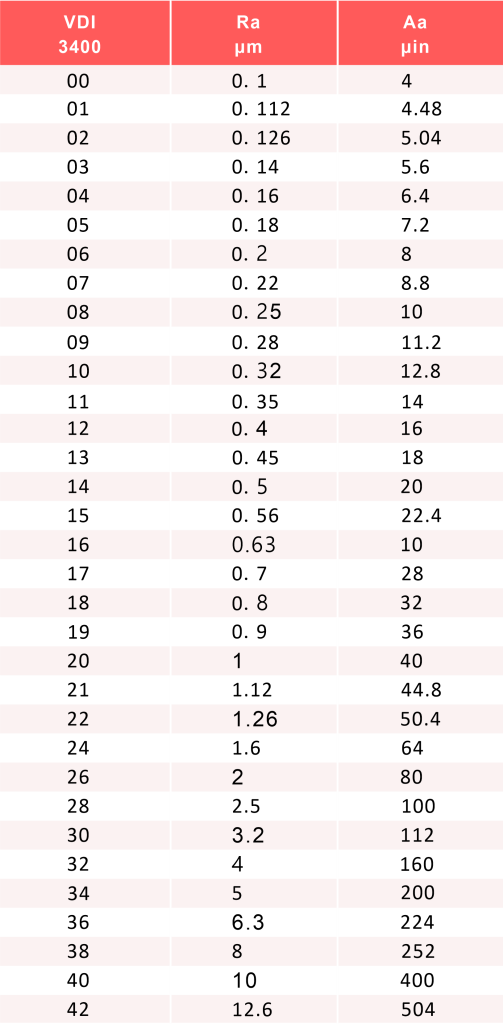
Most often, Electrical Discharge Machining (EDM) is the most prevalent way to create VDI finishes. EDM is a process that removes material from the mould surface in a fashion I can only liken to that of +voltage electrical spark surface erosion.
There are many times the question is posed as to how SPI and VDI are different. The differences are big, particularly when you grasp the entire concept of finishing. What the best and smoothest VDI does is basically the same as SPI C-1 grade. The VDI standard primarily drives compatibility toward matte and textured surfaces, proving its appropriateness to creating the semi-glossy or glossy surfaces that SPI A and B grades are capable of producing.
The difference is due to professionalism and costs that drive all of these finishes to be more costly than VDI. The highly polished SPI finishes typically take far more labour and cost and therefore SPI will be more costly than anything VDI based.
Why Use Injection Molding Surface Finishes?
You may think that the choice of surface finish in injection moulding is a small matter. However, it’s a crucial decision that will have a significant impact on your product in numerous ways.
The right finish can elevate a product from merely okay to truly great, but the wrong one can lead to production and functional issues. Let’s take a look at the key reasons why injection molding surface finishes are so important.
1. To improve the aesthetics of parts
The primary reason for selecting a particular plastic finish is its aesthetic appeal. The finish gives your product its appearance. A part with a high-gloss surface can look elegant, modern and expensive.
A matt surface, on the other hand, can make it appear more discreet, sophisticated or robust. Textured plastic surfaces that resemble leather or wood can lend an appearance of specialness and high-end quality. The appearance of these plastic surfaces affects how customers perceive the quality and value of your product.
2. Improved mold release
Surface treatments aren’t just important for appearance. They are also important for the manufacturing process. After the plastic part has cooled, it must be removed from the steel mould during injection moulding.
Sometimes, a very smooth, polished surface can act like a suction cup, making it difficult to remove the part. This can lead to longer production times and even breakage of the injection moulded parts. A surface with a light texture can break this vacuum, allowing air to get between the part and the mould. This makes the part easier to rem
3. To improve the functionality of the parts
The surface of a part can also have a direct impact on its functionality. For example, a handle or button with a textured surface is easier to grip, making the product safer and easier to use. In some cases, a certain roughness of the surface can help moving parts slide more easily.
The surface can also affect other tasks that need to be performed. A surface that is slightly rougher than smooth will hold paint better than a completely smooth surface. This means the paint will last longer and won’t flake off as easily.
4. Mask defects
The process of injection moulding is complex, and sometimes, small cosmetic defects can appear on the surface of the parts. Some of these surface defects are flow lines, which show the path of the molten plastic, and sink marks, which are small indentations.
Another common problem is weld seams, which occur when two streams of plastic come together. A textured surface is ideal for concealing these small defects. By breaking up the flat, reflective surface, things like fine weld seams are less noticeable. This can save you money by reducing the number of parts that are rejected because they don’t look good.
How To Choose a Suitable Injection Moulding Surface Finish
How do you choose the right injection mold surface finish when there are so many? The choice depends on a careful consideration of appearance, usefulness and ease of manufacture. Here are the key points to think about.
1. Consider the intended use of the product
First and foremost, consider where and how people will use your product. Does it need to resemble an electronic device? A semi-gloss finish might be just right. Is it a handle for power tools?
Then, a surface with a lot of texture for grip would be better. You should always be guided by the function of the injection-moulded plastic parts. Think about where it will be used and what the surface needs to be able to do.
2. Check the aesthetic requirements
Consider what the product should convey to the user and how it aligns with your brand. To demonstrate that a vanity case is a premium product, it may need to have a flawless A-1 gloss finish.
On the other hand, part of a car dashboard might have a certain textured finish to reduce glare and hide dust. The surface finish you choose for injection moulding is an important part of the product’s design language. It is also the best way to hide any imperfections on the surface.
3. Consider the type of material
The plastic materials you choose will have a significant impact on the appearance of the final product. Not all materials can be given all finishes. TPE, for example, is a soft, flexible material that cannot replicate the fine details of a highly polished surface, unlike a hard material such as ABS or polycarbonate.
If you add fillers, such as glass fibres, to the materials used for injection moulding, the surface appearance will also change, and it is often impossible to achieve a high gloss. The materials you choose and the temperatures at which they melt during the injection moulding process must harmonise with the finish you want. Some additives to the material can also change the appearance.
4. Check for mould release and durability
Finally, think about how manufacturing works in real life. We’ve talked about how a super smooth surface can sometimes make it difficult to release the part from the mould. A little texture can make it easier to release the mould. You should also consider how quickly the injection is administered.
Sometimes, a high injection speed can make welds or other defects more visible. A textured surface can help hide these defects. The goal is to develop a process that produces parts with fewer weld lines while maintaining high quality. Always keep in mind what the surface will look like throughout the product’s life.
Conclusion
It’s clear that choosing the right injection moulding surface finish is more than just an afterthought. It is an important design decision that balances appearance, function and ease of production.
Every choice, from a high-gloss finish to a textured surface, affects how your product looks, feels, and functions. You can make a smart choice by considering the end application, the type of material, and how the injection moulding process will actually work.
This way, you can produce plastic moulded parts that not only look good but also work perfectly for your customers.
Frequently Asked Questions
Q1. How does the choice between textured and polished finishes affect the injection molding process?
Choosing between textured surface finishes and polished finishes significantly impacts the injection molding process.
A highly polished, glossy finish requires extensive mold polishing to remove all mold machining marks. While aesthetically pleasing, these smooth surfaces can sometimes cause parts to adhere to the mold, necessitating adjustments to the process.
Conversely, textured plastic finishes can enhance mold release and are effective at concealing minor process-related imperfections.
Q2. What is surface roughness Ra and why is it important for injection molded parts?
Surface roughness Ra is a crucial measurement in defining a surface finish. It stands for Roughness Average and calculates the arithmetic average of the microscopic peaks and valleys on a part’s surface. A low Ra value indicates a very smooth, glossy surface, while a higher Ra value points to a rougher, more textured finish. This measurement is vital because it removes ambiguity.
Instead of just saying “a light matte finish,” you can specify an exact surface roughness value (e.g., Ra 2.5 µm), ensuring the finish on your injection molded plastic parts is consistent and meets precise functional and aesthetic requirements.
Q3. Can any plastic material achieve any surface finish?
No, the material choice is critical. Softer, more flexible plastics may not hold the fine details of an intricate texture or achieve the high gloss of a mirror polish. The material’s flow characteristics and required melt temperature during the injection molding process also influence how well it replicates the mold’s finish.
Q4. What is the core difference between SPI and VDI finishes?
SPI (Society of the Plastics Industry) is an American visual standard where a steel mold is polished to achieve a specific look. VDI (Verein Deutscher Ingenieure) is a German standard that defines a specific texture depth on the hardened tool steel, creating a tactile plastic surface finish.
Q5. How is a high-gloss, smooth SPI surface finish achieved?
Creating a smooth SPI surface finish involves meticulously polishing the mold cavity. The process uses progressively finer abrasives, sometimes starting with grit sanding stones and finishing with diamond paste to produce a mirror-like surface on the final part.
Q6. Why choose a textured finish over a smooth one?
A textured mold is excellent for hiding imperfections, reducing weld lines visibility, and improving grip. This texture is applied directly to the mold, offering a more durable and cosmetically forgiving surface than a highly polished, smooth alternative.