Reaming Holes: A Basic Guide To The Reaming Operation

What Is Reaming?

what is reaming

Reaming is a sizing and finishing operation performed on a pre-existing hole. A rotating cutting tool called a reamer is fed into the hole to slightly enlarge and improve the geometric accuracy and surface finish.

The goal of reaming is to produce holes that are extremely precise in size, roundness, straightness and surface finish. It is usually performed after drilling to improve the accuracy of the hole.

What Is The Purpose Of Reaming?

There are several reasons why reaming is done:

To hold precise diameters and roundness tighter than what drilling can achieve

Reaming allows extremely precise hole diameters and near-perfect roundness that is difficult or impossible to achieve with drilling alone. The smooth cutting action of the reamer removes just enough material to bring the hole to the exact intended size while regularizing any out-of-roundness from the previous drilling operation. 

Reamers can consistently produce holes with tolerances down to 0.0002 inches when properly utilized. This is vital for precision fittings like bearings, shafts, and pins that need to mate smoothly and tightly within the reamed holes. 

The exceptional dimensional precision also allows parts to be reliably interchanged in manufacture, assembly, and repair. Overall, reaming gives a level of hole size and roundness control that exceeds the capabilities of even the most precise drilling methods.

To remove material left from previous operations like milling machine use

Drilling, even when performed with great care and sharp bits, inevitably leaves residual chips, burrs, and jagged edges inside the newly formed hole. The cutting edges and flutes of a reamer are designed to shear off these small defects as the tool advances through the hole. 

Reaming clears out unwanted material remnants and provides a clean finish ready for final use. This smoothing action also straightens any minor wobbling or wandering that may have occurred during drilling, improving accuracy. 

The ability of reamers to remove unwanted leftovers makes them an indispensable finishing step after any kind of hole creation, whether done by drilling, punching, laser cutting, or alternate processes. The reamer essentially “cleans house” inside the hole.

To improve the surface finish and remove burrs

In addition to precision sizing, reamers also greatly enhance the surface finish inside previously drilled or punched holes. While drills leave behind a rough, irregular surface with visible spiral marks along the interior of the hole, a reamer provides an exceptionally smooth finish essentially equivalent to a fine polishing step. 

The cutting edges slice away any remnants of visible tool marks, chatter, tear-out or other defects. This leaves the hole with a clean, polished appearance ready for final assembly or finishing.

At the same time, the reamer shears away the tiny but sharp burrs or jagged edges often left after drilling operations. Removing these burrs improves safety while handling parts and prevents any potential damage if burrs detach inside precision assemblies. 

The combined deburring and surface finishing actions make reaming mandatory for components that must have flawless interior hole walls.  

To straighten slightly crooked holes from previous operations

Drilling holes perfectly straight and centered can be challenging, especially in materials prone to wandering or when using older, worn, or improvised equipment. Even the most experienced machinists occasionally end up with holes that are ever-so-slightly off axis. 

Fortunately, reaming can effectively straighten somewhat crooked holes thanks to the guiding action built into the process. As the reamer advances through the hole, its precision grinding and angles gently “nudge” the interior walls back into alignment. 

As long as the waywardness is minor, a reamer will machine away deviations as it cuts,realigning  the hole. This straightening effect allows reaming to improve accuracy and perpendicularity even in holes that are initially skewed. 

The end result is nicely centered, straight holes – a vital prerequisite for smooth insertion of shafts, bearings and other cylindrical parts which would otherwise bind up.  

To provide excellent fits for shafts and pins

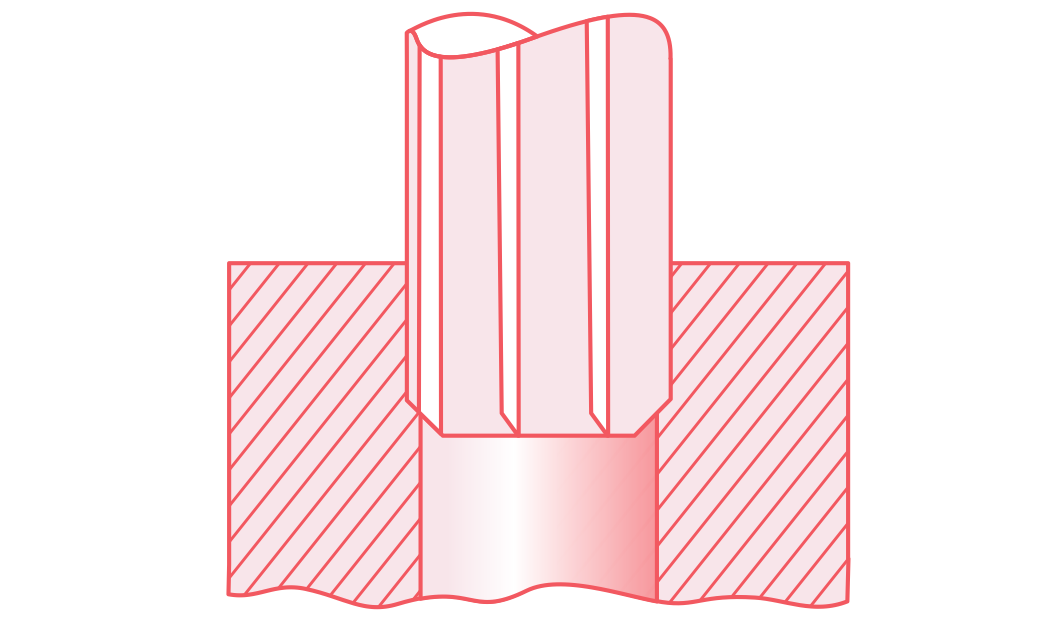
Thanks to its combined hole sizing, finishing and straightening abilities, reaming creates holes that mate perfectly with pins, shafts and other cylindrical parts that must fit or slide smoothly inside them. The ultra-precise dimensions ensure just the right amount of clearance or interference is present to give an ideal slip fit or slight press fit. 

Too loose, and the mating part will rattle around undesirably. Too tight, and assembly becomes difficult if not impossible. 

Reaming hits the narrow tolerance “sweet spot” in between that ensures easy assembly yet with no slop or play once mated components are joined. This gives reamed holes the ability to retain shafts and pins with a secure, wobble-free fit while still permitting smooth insertion and removal. 

Such precision mating between reamed holes and pins/shafts is simply not possible otherwise. It makes reaming an essential preparation step whenever cylindrical parts must fit accurately within holes.

Overall, the purpose of reaming is to improve precision, accuracy and surface finish beyond what can be achieved in regular drilling.

What is a reaming process?

CNC Reaming

The reaming process involves these basic steps:

Step 1: Drill Hole Slightly Smaller

First, a hole is drilled that is slightly smaller than the final desired reamer size. This provides extra material for the reamer to remove.

Step 2:  Insert Reamer

The appropriately sized reamer is then inserted into the hole by hand or using a machine like a drill press.

Step 3:  Ream Hole

The reamer smoothly cuts away material as it is rotated in the hole, enlarging the hole to the precise final dimension while greatly improving accuracy and surface finish.

Step 4: Repeat as Needed

For difficult materials, the reaming process may need to be done in several repeating steps with progressively larger reamers to reach the final size. This prevents tool breakage.

Step 5: Deburr Hole

The hole is deburred to remove any small burrs creating holes left from reaming using deburring tools or abrasive cloth.

Types of Reamers

There are many types of reamers available:

 Hand Reamers

hand reamers

Simple, inexpensive reamers for use by hand. Common in many home shops.

Straight Flute Reamers

Straight Flute Reamers

Have straight cutting edges and are used for most general reaming of common materials.

Spiral Flute Reamers

Spiral Flute Reamers

Spiral cutting edges for easier chip removal in deep holes or tough materials. Prevent chip clogging.

Adjustable Reamers

Adjustable Reamers

Can be manually adjusted to cover a size range for different hole diameters.

Expansion Reamers

Expansion Reamers

Have three or more fingers that can be expanded to different sizes within a range. Used where several hole sizes are needed.

Benefits of Reaming

There are many crucial benefits that the reaming process provides:

Extreme dimensional accuracy and roundness in holes:

Reaming allows holes to be sized to incredible accuracies down to 0.0002 inches and achieve near-perfect roundness. This level of precision is difficult or impossible to reach with drilling alone.

Cutting Edges - Excellent surface finish and removal of burrs:

The smooth cutting action of a reamer leaves an exceptionally fine surface finish free of chatter marks or roughness. All burrs and jagged edges left from previous operations are sheared off.

Fixing An Existing Hole - Straightening of crooked holes from previous operations like drilling:

Even slightly off-center or crooked holes can be straightened by the guiding action of a reamer. This is vital for ensuring holes are perfectly straight.

Outstanding fits for pins, shafts and bearings:

The fine accuracy and finish provided by reaming creates exceptional slip fits or slight interference fits for mating parts like pins, shafts and bearings. This ensures smooth assembly while retaining tightness.

Consistent hole size across a production run:

By using the same reamer, dozens, hundreds or even thousands of identical holes can be produced in a manufacturing run. This level of consistency is unattainable otherwise.

Allows use of less precise drilling as first operation:

Because reaming removes more material, relatively imprecise drilling can be utilized first before reaming brings everything to final spec. This saves time and cost while retaining quality.

Overall, reaming is an indispensable process when ultra-high-precision holes are required in a woodworking or metalworking project. It takes hole sizing and finishing well beyond what drilling alone can achieve. For the ultimate in roundness, straightness, dimensional precision and surface finish, reaming is a must.

Reaming Tapered Holes

reaming holes

In addition to straight holes, reaming can also improve the accuracy and finish of existing tapered holes. Taper reaming is performed using tapered or conical reamers available in various standard and custom tapers.

The process of reaming tapered holes is essentially identical to reaming straight holes. A rotating tapered reamer is inserted into the rough tapered hole and fed axially through the workpiece, removing a slight amount of material while finishing the interior walls. The same benefits of improved size control, roundness, surface finish and straightness are realized.

Taper reamers require rigidity in the machine setup just as cylindrical reamers do. Any deflection under cutting forces will transfer taper inaccuracies. Dedicated arbors or mounts like taper sockets help minimize runout. Slow speeds with smooth pressure should be used to advance the rotating reamer into the tapered hole to avoid tool breakage while cutting.

Reamed taper holes provide precision fits needed for morse tapers, machine tapers, tool holders and other applications where accurate, repeatable fits are needed on mating tapered components. This makes reaming an important process consideration for any shop that works with tapered tooling and workholding devices.  

Reaming Vs. Boring Vs. Drilling, What is Difference?

Reaming Vs Boring Vs Drilling

Reaming, horizontal boring mill, and drilling are all hole machining processes but achieve different results:

Drilling is used to create initial holes in the workpiece by removing material with a rotating drill bit. It does not produce highly precise holes.

Boring uses single-point cutters to enlarge and improve existing holes for better geometric accuracy. It offers more precision than drilling but less than reaming.  

Reaming gives the highest precise diameter for hole size, roundness, straightness and surface finish by removing just a small amount of material from a drilled hole.

Tips and Precautions for Reaming Operations

Reaming can produce exceptionally precise holes if done properly, but also leads to poor results or tool damage if basic guidelines aren’t followed. By understanding key tips and exercising caution during reaming, shops can achieve consistent success. Use these techniques, precautions, tool selection and machine considerations to create perfect reamed holes every time.

Proper Cutting Fluids

Cutting fluids are essential during reaming to:

Lubricate the tool cutting edges

Cool the tool and workpiece  

Flush away metal chips

Prevent built-up edge on the reamer

Reduce friction and tool wear

Soluble oils or petroleum-based fluids work well for most reaming. At minimum, a light cutting oil should be applied to the reamer and hole. For blind holes, oil-based fluids are preferred since they remain in the hole better.

Use flood coolant if possible, applying from both sides of the hole for through holes. Utilize misters for limited flood cooling.

Greases are another option for lubrication but can leave residue. Dry reaming is possible in some non-ferrous materials if required.

Secure Workpiece Clamping

The workpiece must be securely clamped in a vise, fixture or chuck to prevent any vibration or movement during reaming.

Even minor looseness can lead to chatter, poor finish or inaccurate hole size. This issue worsens with increasing hole depth.

Dedicated fixtures with backing plates give the most rigid setups. For existing holes, use perfectly fitting solid bushings under the material to minimize runout.

Pre-drilling a pilot hole allows securing workpieces on a center drill for additional stability when reaming on a lathe or milling machine.  

Appropriate Spindle Speeds and Feed Rates

Slower spindle speeds between 100-500 RPM are recommended for most both hand reamer and machine reaming, depending on material and hole size. This prevents tool chatter while allowing effective cutting.

Feed rates should match spindle speeds based on material hardness and desired finish. Typical feeds range from 0.002-0.012 IPR. Harder materials require slower, more controlled feeds.

Finding the right balance between speeds and feeds prevents reamer breakage while giving good hole finish. Aggressive parameters lead to problems.

Rigid setups allow slightly faster operations. Using proper cutting fluid helps permit increased speeds/feeds.

Even Pressure and Control

Smooth, continuous pressure should be applied when feeding the rotating reamer into the workpiece by hand or machine.  

Excessive pressure can break the reamer, cause chatter or result in bell-mouthed holes. Insufficient pressure leads to poor or multiple cutting edges.

Spindle power feeds or hand-turning using a smooth, steady motion provides the best control. Never hammer machine spindle or force a reamer.

Periodic Chip Clearing

During deep hole reaming, regularly back the tool out partially to clear chips and apply fresh cutting fluid to the flutes.

Allowing chips to pack into flutes causes increased friction, poorer cutting and potential tool breakage, especially with straight flutes.

Spiral flute reamers handle chip removal better in deeper holes. Vacuum chip systems also help keep holes clear.

Step Reaming Tough Materials  

Harder materials often require step reaming to size, using progressively larger reamers for the finishing passes.

Attempting to remove too much material at once risks tool failure. Step reaming only takes off a few thousandths on the final passes.

Ductile materials like aluminum can often be single-step reamed to final dimension. Use multiple steps in harder metals or tough alloys.

Reamer Type and Size Considerations

Hand reamers are best for smaller holes up to around 1″ diameter depending on the material. Above this range, machine reaming is preferred.

Select a full reamer diameter, slightly larger than the existing hole size. Allowance depends on hole tolerance but 0.005-0.015” oversize is typical.

Standard jobber length straight flute reamers work for most applications. Use spiral flutes for deeper holes or chip clearance.

Carbide reamers give longer tool life in hardened or abrasive alloys but have higher initial cost. They are more brittle if dropped or abused.

Cobalt steel reamers offer a good compromise of strength and durability for common machining use on ferrous and non-ferrous alloys.

Rigid, Stable Milling Machine Setup

For machine reaming, the associated machine tool must have enough rigidity and power to drive the rotating machine reamer without chatter, vibration or flexing.

Drill presses have minimal rigidity for reaming over around 1” diameter or in harder metals. For production use, a vertical mill, machining center, or lathe with a boring head is preferred.

For best results, use a solid machine mount like a Morse taper spindle rather than extended holders prone to deflection under reaming loads.

Common Reaming Mistakes to Avoid During Reaming Process

Here are key mistakes that lead to problems during reaming:

Using incorrect or dull reamers

Attempting to ream with non-reamer tools like drill bits or end mills often results in irregular, oversized and poor tolerance holes.

Running at excessively high spindle speeds   

High RPMs overheat the reamer edges, causing premature wear, dimensional inaccuracy and potential tool failure.

Applying uneven or too much feed force

Inconsistent pressure while reaming introduces vibration, poor finish, bell-mouthed holes and other defects  

Allowing vibration or workpiece movement

Any vibration transfers to the reamer, causing irregular cutting, tool chatter and inaccurate sizing

Failing to clear chips from deep holes  

Packed chips increase friction against flutes, resulting in higher temperatures, greater type of reamer, wear and potential breakage

Reaming holes drastically under the final size

Removing too much material on the final pass risks reamer damage from excess loads and heat generation

Plunging (forcing) reamers into materials

Hammering or forcing reamers under power can fracture the delicate edges and destroy the tool

Neglecting proper cutting fluid application

Lack of lubricating oils or coolants leads to higher friction and temperatures that accelerate wear and dimensional errors

Achieving Reaming Success With A New Or Existing Hole

Follow this checklist to achieve the best results:

  • Select suitable tool type and sizes

  • Set rigid, stable machine setup or workholding  

  • Use proper cutting fluids and application

  • Balance spindle speeds and feed rates

  • Clear chips periodically from deep holes

  • Step to final size for tough materials

  • Apply smooth, even pressure when reaming

  • Secure the workpiece to prevent any movement

Careful attention to reaming parameters, techniques and tools will enable the creation of highly accurate holes with precision fits. Understanding the methods cutting tools that professional machinists rely on for accurate reaming is the first step towards hole machining success.

Achieving Hole Perfection with Reaming Process

Reaming may seem like a simple hole finishing operation, but proper understanding of reamer selection, operating parameters, and techniques is crucial for success. When performed correctly, reaming becomes an indispensable process for achieving ultra-precise hole dimensions and surface finish.

However, neglecting key reaming principles inevitably leads to inaccurate sizes, poor tolerances, unacceptable finishes, and potential tool breakage. By studying reaming best practices and understanding what separates adequate from exceptional hole quality, shops can consistently produce perfection.

Author

Gavin Leo is a technical writer at Aria with 8 years of experience in Engineering, He proficient in machining characteristics and surface finish process of various materials. and participated in the development of more than 100complex injection molding and CNC machining projects. He is passionate about sharing his knowledge and experience.