Injection molding wall thickness guide for custom parts

This is article is a complete guide to injection molding wall thickness.

If you are a product designer and desires;

  • To gain essential knowledge on injection moulding wall thickness
  • Acquire tips on the best practices used in injection moulding.
  • Get answers to some of the FAQs on injection moulding

This article is for you. Now, let’s dive in.

What is Injection Molding Process?

Injection molding process

Injection molding involves introducing smelted/molten material into a closed mold. It is melted plastic is then allowed to stay inside as it cools and solidifies. Finally, the injection mold is opened to release the formed product.

What is Wall thickness in Injection Molding?

Wall thickness refers to the distance between the outer and inner surfaces of a plastic part in injection molding. In injection molding, wall thickness is crucial since it greatly determines the success or failure of the process.

Essential Knowledge on Injection Molding Wall Thickness for Product Designers

There are a few nuggets you’ll want to maintain in your toolkit if you’re planning to dive into the thrilling world of designing items for injection molding. These are clearly discussed below:

injection molding wall thickness

1. Maintain uniform wall thickness

Have you ever realized that the walls of, say, a bottle cap, a plastic chair, or even an injectable syringe are fairly uniform?

Uniform wall thickness is one of the fundamental rules in injection molding. This is critical as it helps avoid sinking, warping or producing unsuitable products.

2. Minimum Injection Molding Wall Thickness

In most cases, the strength and structural requirements of the product or component determine the minimum wall thickness for injection molding.

The general rule of thumb is that the minimum wall thickness for injection molding is 0.3 mm (0.012 inches). Any thickness less than this will most likely result in failure.

Always consider working with the least possible wall thickness. It improves the efficiency of the process by yielding shorter production cycles. Also, the process saves on material usage.

3. Maximum Injection Molding Wall Thickness

Ideally, excessively thick walls should be avoided in injection molding. This is because they usually lead to problems like under-filling, distortion, and significant dimensional shifts.

Nevertheless, thicker walls may sometimes be required due to heavy loads placed on the component, the need for thermal insulation, or even just to make the component appear heavier and more solid.  

A maximum wall thickness of 0.5mm (0.02 inches) is highly recommended for injection molding depending on the polymer being molded.

4. Injection Molding wall Thickness of common plastics

injection molding wall thickness

Here are some popular polymers used in injection molding along with the acceptable wall thickness ranges for each:

ABS:

1.2 – 3.5mm

Acetal:

0.75 – 3.0mm

Acrylic:

0.6 – 12mm

Liquid Crystal Polymer:

0.75 – 3.0mm

Long-Fiber Reinforced Plastic:

2 – 25mm

Nylon:

0.75- 2.9mm

Polycarbonate:

1- 3.5mm

Polyester:

0.65- 3mm

Polyethylene:

0.76- 5mm

Polyphenylene Sulphide:

0.5 – 4.6mm

Polysulfone:

0.76 – 6.3mm

Polyurethane:

2 – 19mm

Polyvinyl Chloride (Rigid):

2.3 – 6.3mm

Polyvinyl Chloride (Soft):

0.63 – 3.8mm

Please note that these are general guidelines and that the wall thickness may need to be adjusted depending on the application or other design factors.

5. Design for Manufacturability (DFM) for Injection Molding

Design for Manufacturability involves designing a part or component such that the best manufacturing outcomes will be achieved.

70% of the manufacturing costs of an injection molded part can be ascertained by design decisions when DFM is integrated into the process.

Other considerations when designing injection molded parts

In addition to design for manufacturability, there are other factors to bear in mind when designing parts for injection molding. These factors contribute to guaranteeing the end product’s usability, quality, and affordability.

The following are some important considerations to note:

1. Incorporate Draft Angles

Draft Angle

Draft angle is the angle that is specified for vertical walls and other features that are parallel to the direction of the mold opening. The walls of parts should be designed with a slight slant. This makes it easy to remove the parts from the mold without using too much force. 

This angle varies with the material type and the injection mold design. However, in many cases, a draft of 1 to 2 degrees is enough, with an additional 1.5 degrees for every 0.25mm of part thickness.

2. Bosses

Injection molding Bosses

Bosses are cylindrical protruding features designed into a part. They support self-tapping screws, inserts, or other fasteners in a plastic part. 

Always use ribs or gussets to secure bosses to a side wall or the floor. To reduce observable sink marks on the part’s exterior, their thickness should be between 40 –  60 percent of the component’s overall thickness.

3. Ribs

Injection Molding Ribs

Ribs are thin, elongated design elements used to increase a product’s stiffness, strength, or dimensional stability. 

Instead of increasing the thickness of the parts to make them more rigid, always add ribs to them during injection molding. This way, you remove aesthetic flaws such as warping, sink marks, and voids.

Ribs are also more economical to make since they use less material and cool more quickly.

4. Sharp Corners

Think about a river that follows a twisting course. It flows beautifully around the bends, but it is thrown off when it abruptly comes to a steep turn. 

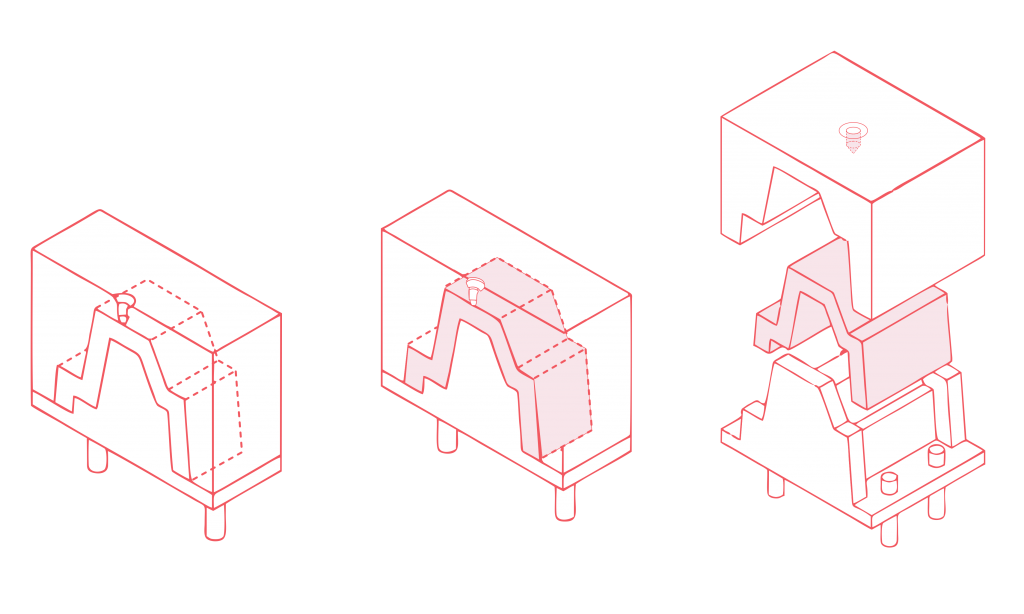
For molten plastic used in injection molding, the same rule applies. Sharp edges can obstruct the plastic’s movement, making it hesitant, sluggish, or even halt. This may result in an imperfect mold fill or the development of unattractive flow lines on the surface of the part. 

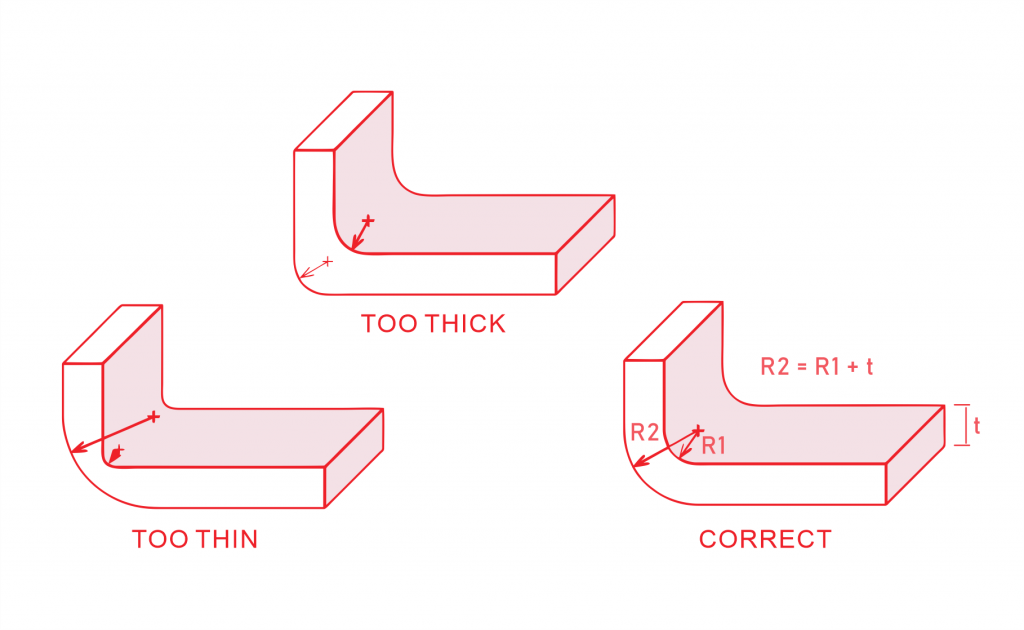
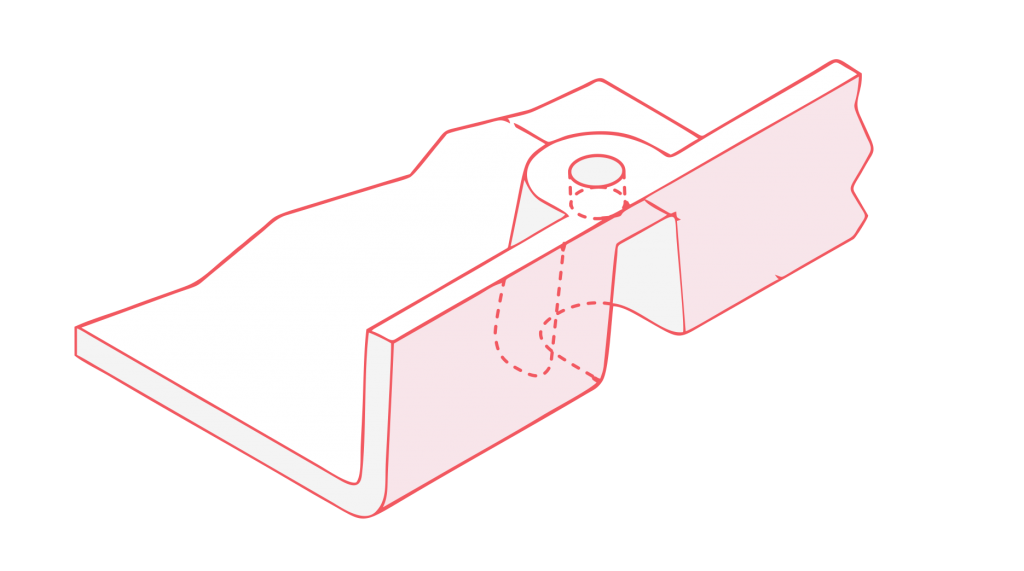
Radiusing sharp corners helps smooth out the transition between surfaces. This improves the flow of plastic during molding. Adding radii also helps distribute stress more evenly, making the part stronger and more resistant to failure. 

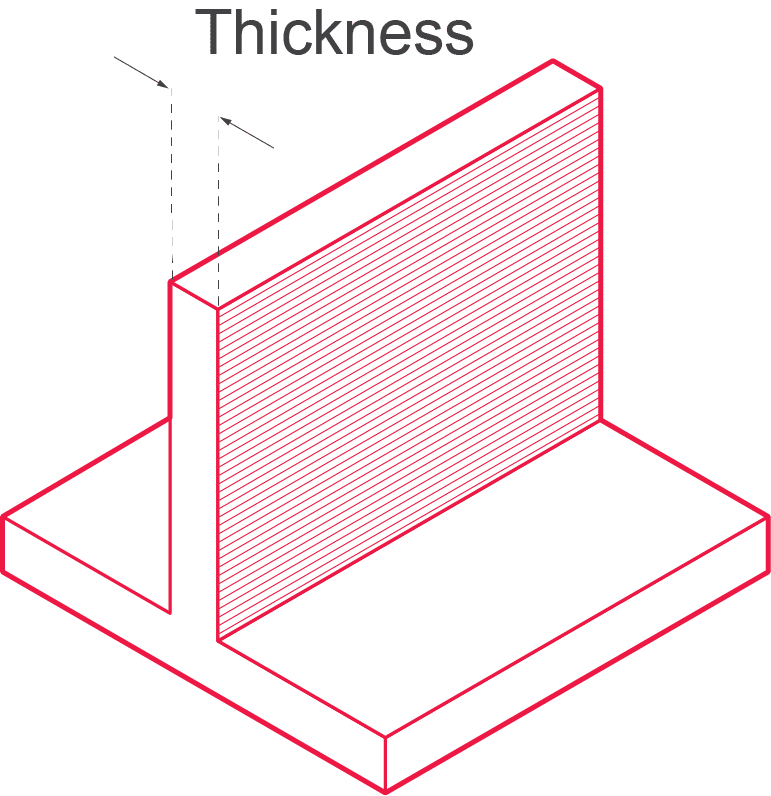
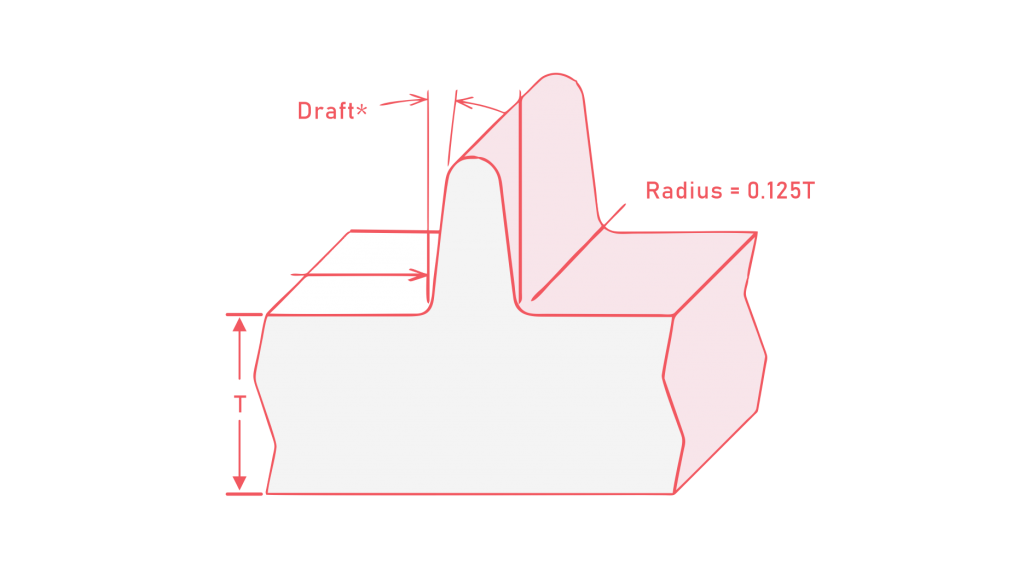
Always use an internal radius that is at least 0.5 times the thickness of the next wall. For external radius, make it thicker than the closest wall by 1.5 times. 

In case your design absolutely needs a sharp external edge on the part, the electrical discharge machining (EDM) method is recommended.

5. Parting line

The parting line is the line where two halves of a mold come together. Proper parting line design is crucial for achieving high-quality parts and efficient manufacturing.

Design the parting line to be symmetrical whenever possible to distribute clamping forces evenly and reduce warpage. Avoid placing critical part features directly on the parting line to minimize variations that could affect functionality.

Keep the parting line as simple as possible to avoid mold design challenges and defects during molding. Ensure the parting line allows for easy demolding and prevents interference or undercuts that may hinder part ejection.

6. Snap-fit design

snap fit joints

Snap-fit design is a process used in injection molding to provide interlocking features in plastic components. They enable quick and secure assembly without the use of extra fasteners like screws, bolts, or clips.

On one part, they have matching tabs, hooks, or protrusions, and on the other, recesses, slots, or undercuts. When combined, these qualities interact with one another to produce a safe and frequently audible “snap”.

It is important to thoroughly assess the application and take into account elements like the anticipated load, material choices, and design limitations. This helps to ensure that the snap-fit design complies with the precise specifications of the product.

7. Shrinkage

In injection molding, shrinkage refers to a plastic part’s contraction or reduction in size as it cools and solidifies after being injected into the mold. The thermal characteristics of the part cause this natural occurrence. The cooling process used in injection molding also contributes to shrinkage.

Although it happens during the cooling phase, a little shrinkage may still persist after the component is ejected as the moisture and temperature balance out. When parts shrink unevenly, warping occurs resulting in serious component flaws.

To minimize shrinkage and manage component dimensions, always consider factors such as part shape, gate placement, cooling system design, and venting. In addition, mold features like cooling tubes need to be strategically placed to provide equal cooling and reduce differential shrinkage.

5 Best practices for injection moulding

To optimize your injection moulding process and part quality while minimizing defects you have to take into account certain best practices.

  • Choose the right parts and mould design
  • Choose the right materials that are less prone to warping e.g. ABS, PS and PC.
  • Control cooling temperature: if care is not taken during the cooling of plastic mold defects like warping will occur.
  • Control injection pressure to avoid warping
  • Adopt Design for Manufacturability. 

Choose Aria for your Injection Molding Project

At Aria Manufacturing we have latest machines for modern production including plastic injection moulding. You can count on our years of expertise and technologies to deliver all your injection moulding needs – auto parts, medical equipment, and industrial precision parts.

Our client Syntech Plastics has this to say about us “They are very responsive and provide very clear, professional support on making injection molded parts. They want our products to succeed and their level of craftmanship is impressive. ” 

FAQs

Q:What are the applications of injection moulding?

A: Injection moulding can be used to produce precision parts for medical equipment, automotive parts, aerospace parts, and industrial equipment.

Q: What are the benefits of injection moulding?

A: Injection moulding is a leading innovation in plastic and metal fabrication because it can produce volumes of identical parts fast and at low cost.

Q: Does mould design really matter in injection moulding?

A: Absolutely. The mould design has direct effect on the quality of the single components and entire product.

Q: Does the quality of injection molding machine matter?

A: Yes. High quality automatic machines produce stellar quality parts faster and at lower costs.

Author

Gavin Leo is a technical writer at Aria with 8 years of experience in Engineering, He proficient in machining characteristics and surface finish process of various materials. and participated in the development of more than 100complex injection molding and CNC machining projects. He is passionate about sharing his knowledge and experience.